Animation Tool
The Animation Tool is a specialized QGIS plugin component designed to create dynamic visualizations of RiverFlow2D model results over time. This tool allows users to generate animations showing how hydraulic parameters (such as water depth, velocity, and water surface elevation) change throughout a simulation, and export these animations as video files for presentations and analysis.

Main Interface
The Animation Tool provides a dockable widget interface that allows users to control the animation of model results and access various export options.
Dialog Window
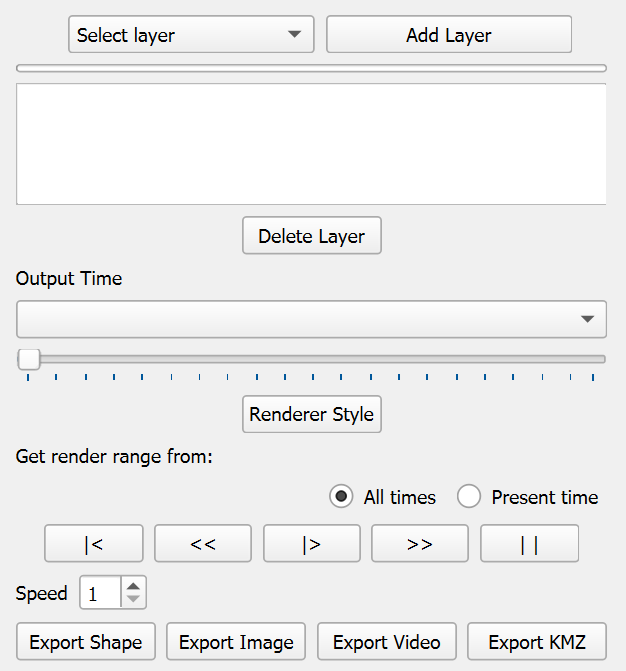
Dialog Controls
| Control | Type | Description |
|---|---|---|
| Select Layer | Dropdown | Selects the layer to be animated. |
| Add Layer | Button | Constructs and adds the selected layer to the layer list. |
| Progress Bar | Progress Bar | Shows the progress of the layer construction process. |
| Layer List | List Box | Displays all loaded layers that can be animated. Each layer in the list can be selected to control which one is currently being animated. Appears after clicking the Add Layer button and successfully loading a layer. |
| Delete Layer | Button | Removes the selected layer from the Layer List. Only active when a layer is selected in the Layer List. |
| Output Time | Dropdown | Selects which time step to display from the simulation results. |
| Time Slider | Horizontal Slider | Allows scrolling through available time steps. |
| Renderer Style | Button | Opens the Renderer Style dialog to customize the visualization settings for the current layer, including color ramp, classification method, and value ranges. |
| Render Range | Radio Buttons | Options to set the render range from \"All times\" (uses min/max values across all time steps) or \"Present time\" (uses only the current time step's min/max values). |
| Animation Controls | Button Group | Includes Rewind ($ |
| Animation Speed | Spin Box | Controls the speed of the animation playback. |
| Export Shape | Button | Opens a dialog to export the current animation frame as a shapefile. |
| Export Image | Button | Opens the Export Map dialog to create map compositions for each time step. |
| Export Video | Button | Opens the Export Video dialog to create video files from the animation. |
| Export KMZ | Button | Opens the Export KMZ dialog to create Google Earth compatible animations. |
Workflow
The main workflow to create an animation is as follows:
-
Select the desired layer in the Select Layer dropdown.
-
Click Add Layer to load it into the list.
-
Select the layer in the layer list.
-
Click Export Video to open the export dialog.
-
Configure the export parameters and generate the video.
Requirements
To use the Animation Tool effectively:
-
Model output files with time series data
-
Sufficient system memory to handle large datasets
-
FFmpeg (bundled with the plugin) for video export functionality
-
Google Earth (optional, for viewing KMZ animations)
Technical Details
Animation Engine
The tool generates frames by updating layer symbology for each time step and rendering a QGIS layout composition.
-
Time steps are computed from simTime and interTime (optionally tsta/tend) stored on the layer.
-
Each frame is exported from a QgsPrintLayout with the map and optional elements (title, time, legend).
Video Export
-
Temporary images are converted to an AVI video using FFmpeg.
-
Quality controls codec and bitrate (best/high/low).
KMZ Export
-
Each frame is georeferenced and saved as a PNG with its associated KML.
-
Files are compressed into a KMZ for Google Earth viewing.
Tips and Best Practices
-
Performance optimization: For large datasets, consider reducing the resolution or extent of the animation to improve performance.
-
Speed selection: For simulations with many time steps, a higher frame rate may be appropriate. For simulations with fewer time steps, a lower frame rate may provide better results.
-
Template design: When creating print layout templates for animations, ensure that all map elements are properly positioned and sized for the intended output resolution.
-
Color ramps: Choose appropriate color ramps for your data to effectively communicate the changes over time. Consider using diverging color ramps for parameters that have meaningful positive and negative values.
-
File size management: High-quality videos can become very large. Consider using lower quality settings for draft versions and higher quality only for final outputs.
-
Time step selection: For long simulations, you may not need to include every time step in the animation. Select a representative subset of time steps to reduce processing time and file size.
Export Image Dialog - Image Tab
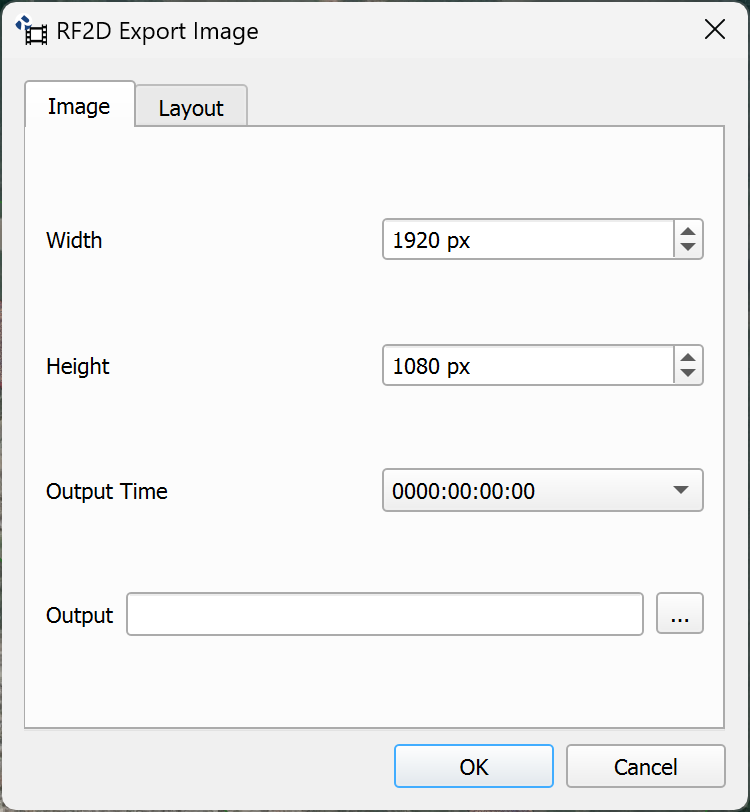
The Export Image Dialog allows users to create a static image of a specific time step from the animation. The Image tab allows configuration of image dimensions, the time step to export, and the output file location.
Dialog Window
Dialog Controls
| Control | Type | Description |
|---|---|---|
| Width | Spin Box | Sets the width of the image in pixels (default: 1920 px). |
| Height | Spin Box | Sets the height of the image in pixels (default: 1080 px). |
| Output Time | Dropdown | Selects the specific time step to export as an image. |
| Output | Text Field | Specifies the path and filename for the output image file. |
| Browse | Button | Opens a file dialog to select the output file location. |
| OK | Button | Starts the image export process. |
| Cancel | Button | Closes the dialog without exporting. |
Workflow
To export an image of a specific time step:
-
Select the layer you want to export in the main Animation Tool interface and click Add Layer.
-
With the layer loaded in the list, click the Export Image button.
-
In the Image tab, configure the desired width and height for the image.
-
Select the time step you want to export from the Output Time dropdown.
-
Click the Browse button (...) next to Output to select the location and filename for the output file (JPG format).
-
Optionally, switch to the Layout tab to configure additional elements such as title, time, and legend.
-
Click OK to generate the image.
Requirements
-
An animatable layer loaded with time series data (fields F1, F2, F3, etc.).
-
Output path set for the
.jpgfile. -
Valid image dimensions (width and height in pixels).
Technical Details
-
Image export uses the
picture()function which renders a single frame based on the selected time step. -
The attribute field corresponding to the time step is calculated as \"F\" + (time + 1), where time is the index selected in the Output Time dropdown.
-
The layer renderer is cloned and updated to display the field corresponding to the selected time step.
-
The image is exported using
QgsLayoutExporter.exportToImage()with DPI setting of 96 and the specified image size. -
The output format is JPG, determined by the file browser dialog.
Export Image Dialog - Layout Tab
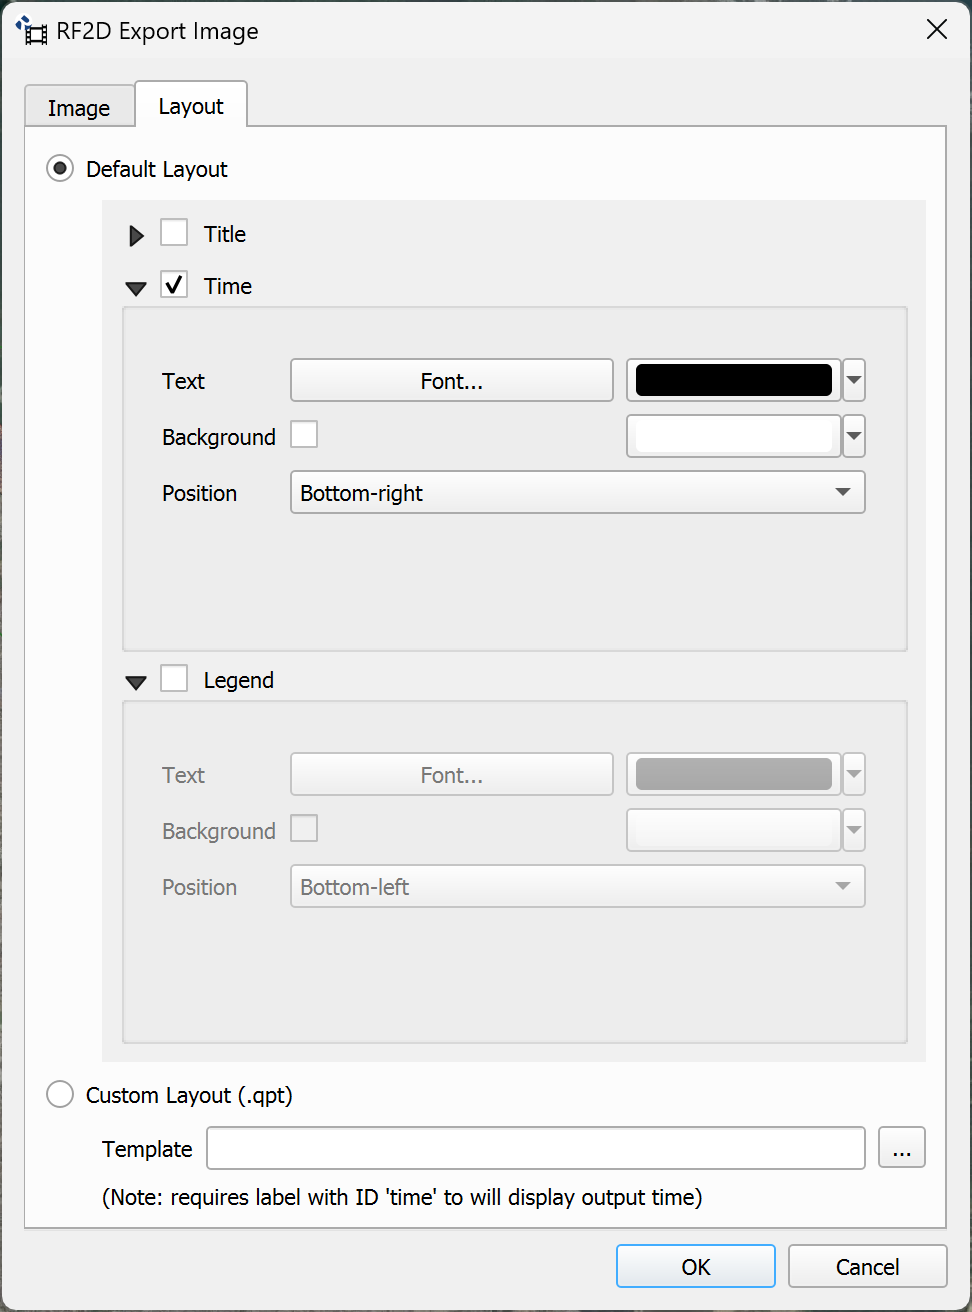
The Export Image Dialog - Layout Tab allows users to configure the layout of the exported image. You can use a default layout with configurable elements (title, time, legend) or a custom layout created in QGIS Print Layout.
Dialog Window
Dialog Controls
| Control | Type | Description |
|---|---|---|
| Default Layout | Radio Button | Selects the default layout option. When selected, allows configuration of Title, Time, and Legend elements. |
| Title | Checkbox Group | Enables and configures the display of a title on the image. Includes options for label, text, font, position and background. |
| Time | Checkbox Group | Enables and configures the display of the time on the image. Includes options for label text, font, position, and background. |
| Legend | Checkbox Group | Enables and configures the display of the legend on the image. Includes options for label text, font, position and background. |
| Custom Layout (.qpt) | Radio Button | Selects the custom layout option using a QGIS Print Layout template file (.qpt). |
| Template | Text Field with Button | Specifies the path to the .qpt template file. A browse button allows navigating to the file. Includes a note indicating that a label with ID 'time' is required to display the output time. |
| OK | Button | Starts the image export process with the specified layout. |
| Cancel | Button | Closes the Export Image dialog. |
Workflow
To configure the image layout:
-
Open the Export Image dialog by clicking the Export Image button on the main Animation Tool interface.
-
Select the Layout tab.
-
To use the default layout:
-
Select the Default Layout radio button.
-
Check the Title checkbox if you want to display a title. Configure the text, font, color, and position.
-
Check the Time checkbox to display the time of the selected step. Configure the font, color, and position.
-
Check the Legend checkbox to display the layer legend. Configure the font, color, and position.
-
-
To use a custom layout:
-
Select the Custom Layout (.qpt) radio button.
-
Click the Browse button (...) next to the Template field.
-
Navigate to the .qpt template file previously created in QGIS Print Layout.
-
Select the file and click Open.
-
Ensure the template includes a label element with id=\"time\" if you want to display the time.
-
-
Switch to the Image tab to configure dimensions and time step.
-
Click OK to generate the image with the configured layout.
Requirements
-
For default layout, no additional files are required.
-
For custom layout, a valid .qpt template file created in QGIS Print Layout is required.
-
Custom templates must include a map item that will be used to render the image.
-
If the template includes a label item with id=\"time\", it will be automatically updated with the time of the selected step.
-
The image aspect ratio will automatically adjust to match the template's page size when using a custom layout.
Technical Details
-
Default layout elements are created using the same classes as video export:
QgsLayoutItemLabel(for title and time) andQgsLayoutItemLegend(for legend). -
Element positions use the same constants: TOP_CENTER, TOP_LEFT, TOP_RIGHT, BOTTOM_LEFT, BOTTOM_RIGHT.
-
Custom templates are loaded using
QDomDocumentandc.readLayoutXml()to interpret the .qpt file. -
When using a custom template, the image width is automatically adjusted to maintain the template's aspect ratio, similar to video export.
-
Time elements are updated via the
composition_set_time()function, which searches for items withid="time"and sets their text to DDDD:HH:MM:SS format. -
The
picture()function incomposer.pyhandles composition creation and image export, reusing much of the video export code.
Export Video Dialog - Layout Tab
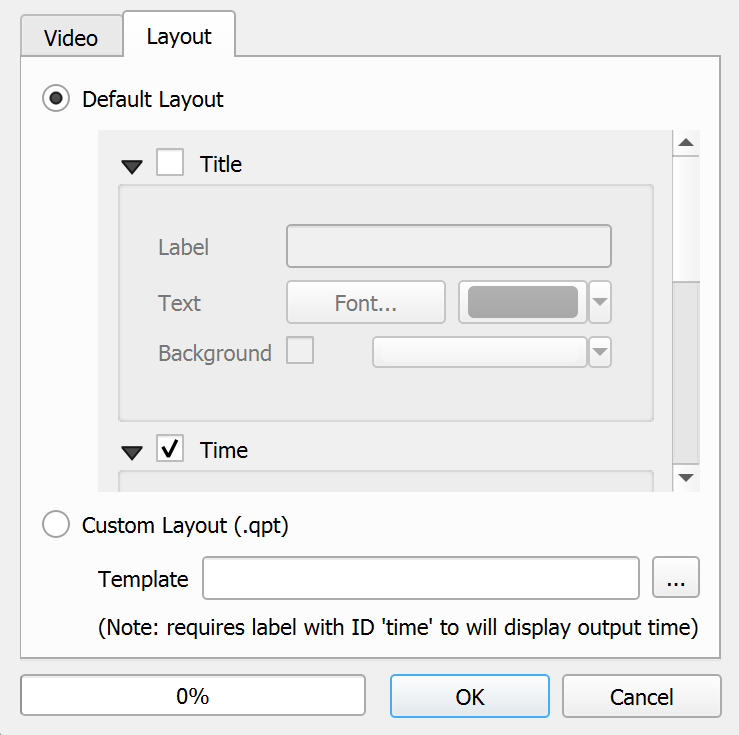
The Export Video Dialog - Layout Tab allows users to configure the layout of the animation. You can use a default layout or a custom layout created in the QGIS Print Layout program.
Dialog Window
Dialog Controls
| Control | Type | Description |
|---|---|---|
| Default Layout | Radio Button | Selects the default layout option. When selected, allows configuration of Title and Time elements. |
| Title | Checkbox Group | Enables and configures the display of a title on the video frames. Includes options for label, text, font, position and background. |
| Time | Checkbox Group | Enables and configures the display of the current animation time on the video frames. Includes options for label text, font, position, and background. |
| Legend | Checkbox Group | Enables and configures the display of the animation legend on the video frames. Includes options for label text, font, position and background. |
| Custom Layout (.qpt) | Radio Button | Selects the custom layout option using a QGIS Print Layout template file (.qpt). |
| Template | Text Field with Button | Specifies the path to the .qpt template file. A browse button allows navigating to the file. |
| Progress Bar | Progress Bar | Shows the progress of the video export process. |
| Export | Button | Starts the video export process with the specified layout and video settings. |
| Close | Button | Closes the Export Video dialog. |
Workflow
To configure the animation video layout:
-
Open the Export Video dialog by clicking the Export Video button on the main Animation Tool interface.
-
Select the Layout tab.
-
To use the default layout:
-
Select the Default Layout radio button.
-
Check the Title checkbox if you want to display a title. Configure the text, font, color, and position.
-
Check the Time checkbox to display the current simulation time. Configure the font, color, and position.
-
Check the Legend checkbox to display the layer legend. Configure the font, color, and position.
-
-
To use a custom layout:
-
Select the Custom Layout (.qpt) radio button.
-
Click the Browse button next to the Template field.
-
Navigate to the .qpt template file previously created in QGIS Print Layout.
-
Select the file and click Open.
-
-
Switch to the Video tab to configure video parameters.
-
Click Export to generate the video with the configured layout.
Requirements
-
For default layout, no additional files are required.
-
For custom layout, a valid .qpt template file created in QGIS Print Layout is required.
-
Custom templates must include a map item that will be used to render the animation frames.
-
If the template includes a label item with id=\"time\", it will be automatically updated with the time for each frame.
-
The video aspect ratio will automatically adjust to match the template's page size when using a custom layout.
Technical Details
-
Default layout elements are created dynamically using
QgsLayoutItemLabelclasses (for title and time) andQgsLayoutItemLegend(for legend). -
Element positions are defined by constants: TOP_CENTER, TOP_LEFT, TOP_RIGHT, BOTTOM_LEFT, BOTTOM_RIGHT.
-
Custom templates are loaded using
QDomDocumentandc.readLayoutXml()to interpret the .qpt file. -
When using a custom template, the video width is automatically adjusted to maintain the template's aspect ratio:
aspect = page_width / page_height; w = aspect * h. -
Time elements in templates are updated via the
composition_set_time()function, which searches for items withid="time"and sets their text to DDDD:HH:MM:SS format. -
Each frame is exported using
QgsLayoutExporter.exportToImage()with DPI setting of 96 and the specified image size.
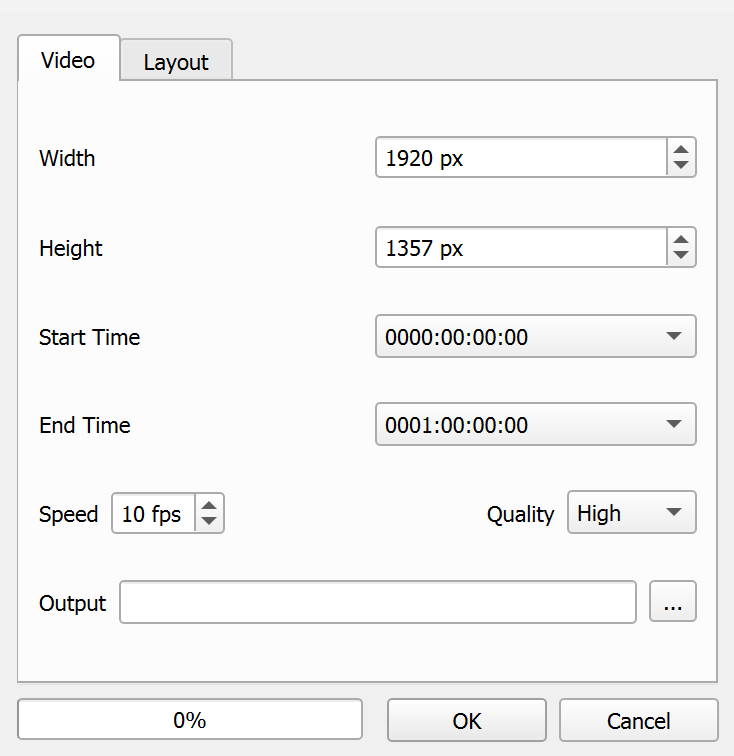
Export Video Dialog - Video Tab
The Export Video Dialog provides advanced options for creating animations with custom layouts and templates.
Dialog Window
Dialog Controls
| Control | Type | Description |
|---|---|---|
| Width | Spin Box | Sets the width of the animation frames in pixels (default: 1920 px). |
| Height | Spin Box | Sets the height of the animation frames in pixels (default: 1357 px). |
| Start Time | Dropdown | Selects the starting time step for the animation. |
| End Time | Dropdown | Selects the ending time step for the animation. |
| Speed | Spin Box | Sets the frames per second (FPS) for the animation (default: 10 FPS). |
| Quality | Dropdown | Sets the video quality (Low, Medium, High). |
| Template | Text Field | Specifies a QGIS print layout template to use for the animation frames. |
| Browse Template | Button | Opens a file dialog to select a template file. |
| Output File | Text Field | Specifies the path and filename for the output video file. |
| Browse Output | Button | Opens a file dialog to select the output file location. |
| Export | Button | Starts the animation export process. |
| Close | Button | Closes the dialog without exporting. |
Workflow
To export a video from the animation:
-
Select the layer you want to animate from the Select Layer dropdown and click Add Layer to load it into the list.
-
Select the layer in the list and click Export Video.
-
Set the time range, speed, quality, and output file.
-
If using a custom layout, select the
.qptfile. -
Click Export to start the video creation.
Requirements
-
At least one animatable layer loaded via Add Layer.
-
Valid time range (Start Time \(\leq\) End Time).
-
Output path set for the
.avifile. -
If using a custom layout, the
.qptfile must exist. -
Bundled FFmpeg available.
Technical Details
-
Export generates temporary images for each time step and then compiles them into an AVI using FFmpeg.
-
Time range is derived from layer custom properties (simTime, interTime, tsta, tend).
-
Layout can be default (title/time/legend) or
.qpt-based, adjusting aspect ratio accordingly.
Export KMZ Dialog
The Export KMZ dialog allows users to create Google Earth compatible animations from the model results.
Dialog Window
Dialog Controls
| Control | Type | Description |
|---|---|---|
| Start Time | Dropdown | Selects the starting time step for the KMZ animation. |
| End Time | Dropdown | Selects the ending time step for the KMZ animation. |
| Output File | Text Field | Specifies the path and filename for the output KMZ file. |
| Browse | Button | Opens a file dialog to select the output file location. |
| Export | Button | Starts the KMZ export process. |
| Close | Button | Closes the dialog without exporting. |
Workflow
To export a KMZ animation for Google Earth:
-
Select the layer you want to animate in the main Animation Tool interface and click Add Layer.
-
With the layer loaded in the list, click the Export KMZ button.
-
In the Export KMZ dialog, configure the time range using the Start Time and End Time dropdowns.
-
Adjust the raster image resolution in the Resolution for raster image field. Higher values produce more detailed images but larger files.
-
Optionally, edit the place name in the Place field (default is \"ProjectName-LayerName\").
-
Click the Browse button next to Output File to select the location and name for the output KMZ file.
-
Click Export to start the export process. The process has two phases:
-
Rasterizing: Converts each time step of the vector layer into a raster.
-
Rendering: Applies symbology and renders each raster with appropriate colors.
-
-
Once the export is complete, a confirmation message is displayed. The KMZ file can be opened in Google Earth.
Requirements
-
An animatable layer loaded with time series data (fields F1, F2, F3, etc.).
-
The layer must be scalar type (depth, elevation, etc.). Vector field layers are not supported for KMZ export.
-
Valid time range (Start Time \(\leq\) End Time).
-
Output path set for the
.kmzfile. -
GDAL installed (included with QGIS) for rasterization.
-
Sufficient disk space for temporary files (automatically deleted upon completion).
-
Google Earth installed to view the exported KMZ file (optional).
Technical Details
-
The KMZ export process consists of three main stages:
-
Rasterization: Each time field (F1, F2, ..., Fn) is rasterized using
gdal:rasterizewith the specified resolution. NoData values are set to -9999. -
Rendering: The original layer's color symbology is applied to each raster. The color ramp configured in the animated layer is used with equal interval classification and 8 classes.
-
KMZ Generation: A KML file is created with
<GroundOverlay>elements for each frame, specifying geographic coordinates and time interval<TimeSpan>.
-
-
Coordinates are automatically transformed from the layer's coordinate system to WGS84 (EPSG:4326) required by Google Earth using
QgsCoordinateTransform. -
The time format in the KML follows the ISO 8601 standard:
1900-01-DDTHH:MM:SSZ, where DD represents the day calculated from the start of the simulation. -
Temporary raster files are stored in two temporary directories: one for raw rasterized rasters and another for rendered rasters. Both are automatically deleted after creating the KMZ file.
-
The final KMZ file is a compressed ZIP file containing the
doc.kmlfile and all rendered.tifimage files. -
The
<LookAt>element in the KML is automatically set to the center of the layer extent with a range of 20,000 meters to provide an appropriate initial view in Google Earth.