Setting up a Google Cloud VM for GPU-Accelerated Simulations
This tutorial provides a step-by-step guide for setting up a powerful virtual machine (VM) on Google Cloud Platform (GCP) equipped with an NVIDIA Tesla V100 GPU. Such a setup is ideal for running computationally intensive RiverFlow2D or OilFlow2D simulations that can leverage GPU acceleration, significantly reducing model run times.
::: shaded Note: Running a VM with a GPU on Google Cloud will incur costs. Windows Server images and GPUs are premium resources. Please review GCP pricing and ensure billing is enabled for your project. The Google Cloud Free Trial does not typically cover GPU usage. See the official documentation for more details: https://cloud.google.com/compute/docs/create-windows-server-vm-instance. :::
The process involves these main steps:
-
Configure and create a new Compute Engine VM instance.
-
Specify the machine type (4 vCPUs and 32 GB Memory).
-
Add and configure an NVIDIA Tesla V100 GPU.
-
Select a Windows Server boot disk.
-
Connect to the newly created VM.
Before you begin
-
You must have a Google Cloud account with a project created and billing enabled.
-
Ensure your account has the necessary IAM permissions. At a minimum, you will need the 'Compute Instance Admin (v1)' and 'Service Account User' roles for the project.
-
Enable the Compute Engine API for your project. This can be done from the APIs & Services dashboard in the Google Cloud Console.
-
You will need an RDP client on your local machine to connect to the Windows VM. Microsoft's Remote Desktop client is available for Windows, macOS, iOS, and Android.
Checking and Requesting GPU Quotas
By default, Google Cloud projects have a GPU quota of zero for most regions to prevent accidental usage. Before you can create a VM with a GPU, you must request and be granted a quota for the specific type of GPU (e.g., NVIDIA Tesla V100) in your desired region.
-
In the Google Cloud Console, navigate to IAM & Admin \(\rightarrow\) Quotas.
-
In the Filter bar, select the Metric property and search for
NVIDIA V100 GPUs. Select it from the list. If it does not appear, you may need to clear the filter and first filter by Service forCompute Engine API. -
This view will show your current GPU quota for all regions. Most will likely be at 0.
-
Find the region where you plan to create your VM (e.g., 'us-central1') and select the checkbox next to it.
-
Click the EDIT QUOTAS button at the top of the page.
-
A panel will open on the right. Enter your desired new quota limit (e.g., 1 for one V100 GPU) and provide a brief justification for your request (e.g., "Required for running GPU-accelerated scientific modeling software").
-
Submit the request. Quota increase requests can take some time to be reviewed and approved by Google. You will receive an email notification once the process is complete. You cannot proceed with creating the VM until your quota request is approved.
Creating the VM Instance
-
In the Google Cloud Console, navigate to the Compute Engine service and select VM instances.
-
Click the CREATE INSTANCE button at the top of the page. This will open the instance creation form.
-
Name your instance: Enter a descriptive name, for example, 'hydronia-gpu-workstation'.
-
Region and Zone: Select a region (e.g., 'us-central1'). For the Zone, select Any (recommended). This allows Google to pick an available zone, which is necessary to trigger the quota request workflow if your quota is insufficient.
Configuring Machine and GPU
This is the most critical step, where you define the computational resources for your VM. The following steps correspond to the selections shown in Figure 20.1.
-
In the main Machine configuration section, first click the GPUs button. This filters the available options to those that support graphics processors.
-
A new Graphics processing units subsection will appear. Configure it as follows:
-
GPU type: Select NVIDIA V100.
-
Number of GPUs: Select 1.
-
Leave the Enable Virtual Workstation (NVIDIA GRID) checkbox unchecked.
-
-
Next, configure the CPU and memory for the VM itself:
-
Series: Ensure N1 is selected.
-
Machine type: Click the Custom button.
-
Cores: Drag the slider or type 4 into the vCPU box.
-
Memory: Drag the slider or type 32 into the GB box. Ensure the Extend Memory checkbox is active.
-

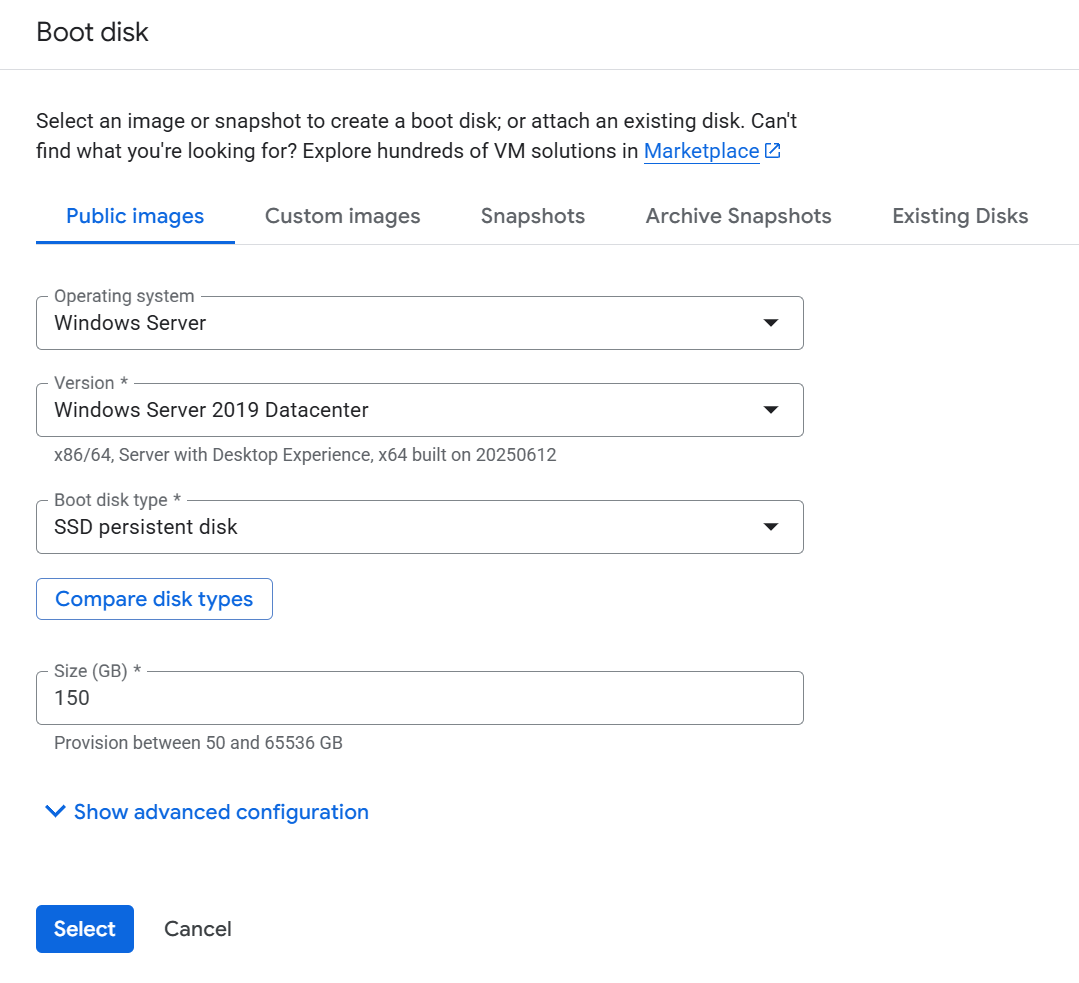
Configuring the Boot Disk and Firewall
-
In the OS and Storage section, click the Change button.
-
In the fly-out menu, make the following selections:
-
Operating system: Select Windows Server.
-
Version: Select Windows Server 2019 Datacenter or a newer version if available.
-
Boot disk type: Select SSD persistent disk for better performance.
-
Size (GB): Set a size appropriate for your needs, for example, 150 GB.
-
-
Click Select to confirm the boot disk configuration.
-
In the Firewall section of the main creation page, check both Allow HTTP traffic and Allow HTTPS traffic. RDP access is enabled by default for Windows instances.
Create the VM and Handle Quota Requests
-
Review all the settings one last time. At the right side of the page, you will see a monthly cost estimate.
-
Click the Create button.
-
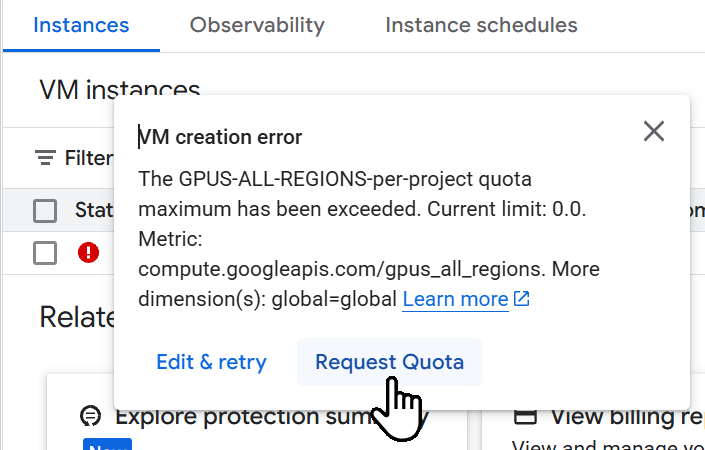
If this is your first time creating a GPU-enabled VM, the creation will likely fail with a "VM creation error" pop-up, as shown in Figure 20.3. This is expected and is the easiest way to request the needed quota.
-
Click the Request Quota button directly within the error dialog.
-
This will open the "Quota changes" request form. You will proceed in two steps:
-
Step ½: Edit Quota (Figure 20.4)
-
In the
New valuebox, enter1. -
In the
Request descriptionbox, provide a brief justification, such as "Software requires GPU to run for scientific modeling." -
Click
Done, then clickNext.
-
-
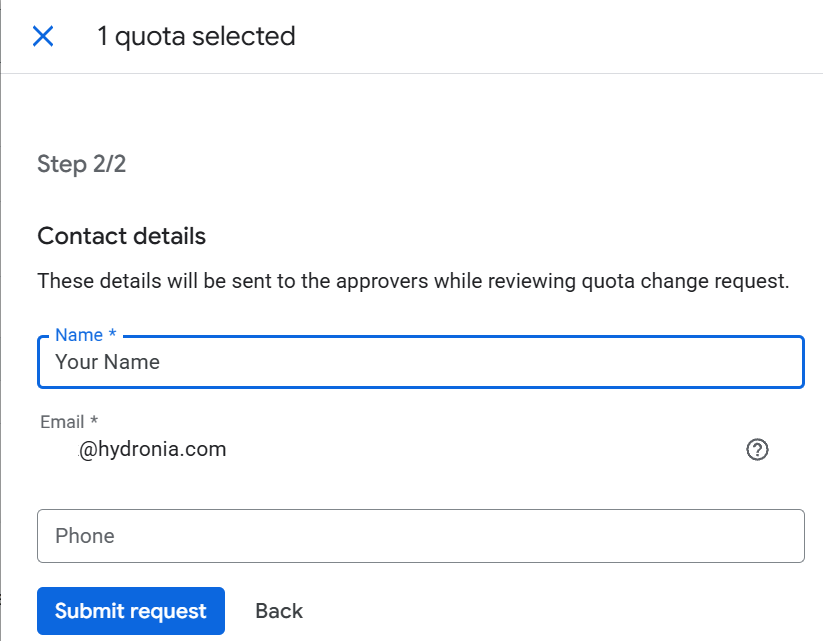
Step 2/2: Contact Details (Figure 20.5)
-
Fill in your contact information.
-
Click
Submit request.
-

-
-
The quota request will be sent to Google for approval. This can take anywhere from a few minutes to a few business days. You will receive an email once the request has been approved. You must wait for the quota approval before you can successfully create the VM. Once approved, return to the VM instances page in the Google Cloud Console.
-
You will see your failed instance with a red error icon. On the far right of the instance row, click the wrench icon to Edit and retry (Figure 20.6).

-
This will take you back to the instance creation page with all of your previous settings pre-filled. Scroll to the bottom and click Create. The VM should now be provisioned successfully.
Connect to the VM
Once your quota request is approved and the VM has been successfully created (indicated by a green checkmark icon on the VM instances page), you can set your password and connect.
-
Click on the name of your new VM instance to go to its details page.
-
Under the Remote access section, click the SET WINDOWS PASSWORD button.
-
A default username (your Google account username) will be shown. You can keep it or change it. Click SET. A new password will be generated. Copy this password and store it securely.
-
You can now connect to your VM. Return to the VM instance details page, click the RDP button, and choose Download the RDP file. Open this file with your RDP client.
-
When prompted, enter the username and the password you just copied. You are now connected to your new Windows Server VM with a powerful GPU, ready for your simulation work.
This concludes the Google Cloud VM Setup tutorial.